
For years, running a highly available (HA) PostgreSQL cluster was considered one of the "final bosses" of database administration. If you wanted a setup that could survive a node failure without manual intervention, you had to piece together a complex puzzle of tools.
I have been managing this "manual way" for a long time now, wrestling with configurations and making sure all moving parts stay in sync. But recently, I finally made the leap and migrated to CloudNativePG, and the difference is huge.
The world has changed. With the rise of Kubernetes and the advent of CloudNativePG, the "modern way" of running Postgres is finally here.
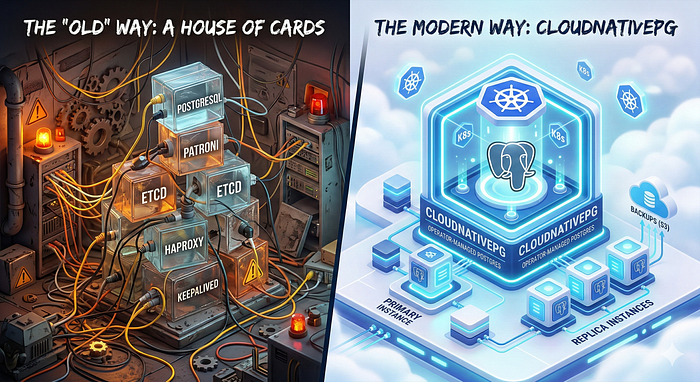
The "Old" Way: A House of Cards?
Before Kubernetes operators like CloudNativePG, the gold standard for Postgres HA involved a stack that looked something like this:
- PostgreSQL: The database itself.
- Patroni: A Python-based template to manage the Postgres lifecycle and replication.
- etcd (or Consul/Zookeeper): A distributed consensus store used by Patroni to keep track of who the leader is.
- HAProxy: To provide a single entry point for applications, routing traffic to the current primary.
- Keepalived: Often needed to provide a Virtual IP (VIP) for HAProxy itself.
The Pain Points
While this stack is robust and proven, it comes with significant overhead:
- Complexity: You aren't just managing a database; you're managing a distributed system (etcd) and a load balancer (HAProxy) on top of it.
- Configuration Hell: Each component has its own configuration file, its own failure modes, and its own scaling requirements.
- Maintenance Burden: Upgrading Postgres often meant carefully orchestrating updates across Patroni while making sure etcd stayed healthy throughout.
- Monitoring: You need to monitor four or five different services just to know your database is "up."
The Modern Way: CloudNativePG
CloudNativePG (CNPG) is an open-source operator designed specifically for Kubernetes. It doesn't just "wrap" Postgres; it treats the database as a native part of the Kubernetes ecosystem.
Why it's different
The most radical thing about CNPG is what it doesn't include. It completely eliminates the need for Patroni, etcd, and HAProxy.
How? By using what Kubernetes already gives you.
- No etcd needed: CNPG uses the Kubernetes API server as its source of truth for leader election and cluster state. If you have a working K8s cluster, you already have the consensus layer you need.
- No Patroni needed: The operator itself manages the instance lifecycle, replication, and failover logic natively.
- No HAProxy needed: CNPG creates native Kubernetes Services that automatically route traffic to the primary or the replicas.
Key Benefits of CloudNativePG
Declarative Management
Everything is a Custom Resource (CR). You define your cluster in a YAML file:
apiVersion: postgresql.cnpg.io/v1
kind: Cluster
metadata:
  name: my-database
spec:
  instances: 3
  storage:
    size: 1Gi
Apply that file, and you have a 3-node HA cluster. Need more replicas? Just change instances: 3 to instances: 5.
Self-Healing
If a node fails, the CNPG operator notices immediately. It promotes a replica, updates the Kubernetes Services, and starts a new instance to maintain your desired count. All automatic, no manual intervention needed.
Integrated Backups
CNPG has native support for barman-cloud-wal-archive and barman-cloud-backup, so you can stream WAL logs and backups directly to S3, GCS, or Azure Blob Storage with just a few lines of configuration.
Zero-Downtime Upgrades
The operator can perform rolling updates of the Postgres instances, so your application stays online even while the database engine is being patched.
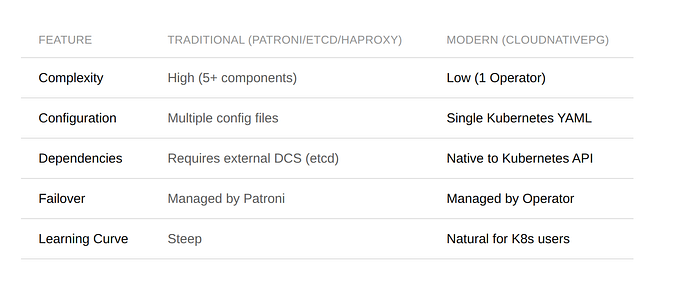
Comparison at a Glance
Tutorial: Deploying CloudNativePG with Terraform
Enough theory, let's get our hands dirty. In this section, I'll walk you through deploying a production-ready CNPG cluster using Terraform. If you prefer plain kubectl and YAML, the same concepts apply. Terraform just gives us reproducibility and state management on top.
Step 1: Install the CNPG Operator
First, we need the operator itself. The Helm chart will create the namespace for us:
# Deploy CloudNative-PG Operator
resource "helm_release" "cloudnative_pg" {
  name             = "cloudnative-pg"
  repository       = "https://cloudnative-pg.github.io/charts"
  chart            = "cloudnative-pg"
  version          = "0.27.0"
  namespace        = "cnpg-system"
  cleanup_on_fail  = true
  create_namespace = true
}
This installs the operator via its official Helm chart. The operator watches for Cluster custom resources across all namespaces and manages PostgreSQL instances accordingly.
Step 2: Install the Barman Cloud Plugin
Remember the integrated backup support I mentioned earlier? To use it, you need the Barman Cloud plugin:
# Deploy Barman Cloud Plugin for backup management
resource "helm_release" "barman_cloud" {
  name             = "plugin-barman-cloud"
  repository       = "https://cloudnative-pg.github.io/charts"
  chart            = "plugin-barman-cloud"
  namespace        = "cnpg-system"
  cleanup_on_fail  = true
  create_namespace = false

  depends_on = [
    helm_release.cloudnative_pg
  ]
}
This plugin enables WAL archiving and base backups to S3-compatible storage, GCS, or Azure Blob Storage.
Step 3: Deploy a Production Cluster
To make deploying a full CNPG cluster easier, I wrote a Terraform module that wraps the cluster configuration, database creation, backups, and secret management into a single reusable module. It's still under active development and not perfect yet, but it already handles the heavy lifting for most use cases.
Here's a real-world example with persistent storage and automated backups:
# Generate a secure password for the database user
resource "random_password" "my_app_user" {
  length  = 32
  special = false
}

module "postgres_cluster" {
  source = "github.com/pascalinthecloud/terraform-module-cnpg-database?ref=v0.0.6"

  databases = [
    {
      name                        = "my-app-postgres"
      owner                       = "my_app_user"
      password                    = random_password.my_app_user.result
      reclaim_policy              = "Retain"
      create_connection_secret    = true
      connection_secret_namespace = "my-app"
    }
  ]

  cluster = {
    name          = "postgres-cluster"
    namespace     = kubernetes_namespace.databases.metadata[0].name
    instances     = 3
    storage_class = "your-storage-class"   # e.g. longhorn, rook-ceph, gp3, etc.
    storage_size  = "20Gi"
    postgresql_max_connections = "200"
  }

  labels = {
    app         = "postgres-cluster"
    environment = "production"
    managed-by  = "terraform"
  }

  backup = {
    enabled                 = true
    s3_endpoint_url         = "https://s3.example.com:9000"
    s3_bucket_name          = var.backup_bucket_name
    s3_access_key_id        = var.s3_access_key_id
    s3_secret_access_key    = var.s3_secret_access_key
    retention_policy        = "90d"
    schedule                = "0 2 * * *"   # Daily at 2 AM UTC
    wal_compression         = "gzip"
    data_compression        = "gzip"
    target                  = "prefer-standby"
    create_scheduled_backup = true
  }
}
So what does this give us?
- 3-instance HA cluster with automatic failover, one primary and two replicas.
- A dedicated database and user with a Kubernetes Secret containing the connection string, automatically created in the application's namespace. Your app just mounts the secret, no hardcoded credentials.
- Automated daily backups at 2 AM UTC with gzip compression, streamed to S3-compatible storage. WAL archiving is also enabled, giving you point-in-time recovery.
- 90-day retention so you can recover from issues discovered long after they happened.
- The
prefer-standbytarget means backups run against a replica, so your primary isn't impacted.
Adding More Databases
Need another application to use the same cluster? Just add another entry to the databases list:
databases = [
  {
    name                        = "my-app-postgres"
    owner                       = "my_app_user"
    password                    = random_password.my_app_user.result
    reclaim_policy              = "Retain"
    create_connection_secret    = true
    connection_secret_namespace = "my-app"
  },
  {
    name                        = "another-service-postgres"
    owner                       = "another_service_user"
    password                    = random_password.another_service_user.result
    reclaim_policy              = "Retain"
    create_connection_secret    = true
    connection_secret_namespace = "another-service"
  }
]
Each database gets its own user, its own credentials secret, and its own namespace isolation, all on the same HA cluster.
Monitoring
Remember how the old way required monitoring four or five different services? With CloudNativePG, monitoring comes almost for free. The operator automatically deploys a PodMonitor resource, which means if you're running Prometheus in your cluster, it will start scraping metrics from your PostgreSQL instances out of the box. No extra configuration needed.
To visualize those metrics, you can import the official CloudNativePG Grafana dashboard. It gives you a full overview of your cluster: instance health, replication status, connection counts, CPU and memory usage, transaction rates, and more.
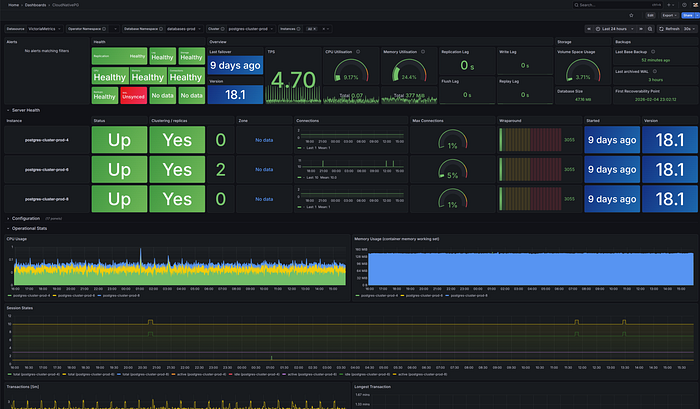
This is what my production cluster looks like. All three instances healthy, replication in sync, and resource usage at a glance. Compare that to the old way of checking Patroni logs, querying etcd, and verifying HAProxy backends separately.
Conclusion
The era of "building your own" Postgres HA stack is coming to an end for those running on Kubernetes. CloudNativePG offers a streamlined, "boring" (in a good way!) approach to database management that lets you focus on your data rather than your infrastructure.
Going from zero to a production-ready, backed-up, highly available PostgreSQL cluster takes just a few Terraform resources. Compare that to wiring up Patroni, etcd, and HAProxy. It's not even close.
If you are running on Kubernetes, CloudNativePG isn't just an option, it's the modern standard.